Wednesday, July 4, 2012

Tortiallas Tortillas, Yum Yum Yum!

Okay,

Update.  So Shortly after my last post, I took what ended up being two long-term substitute teaching positions that lasted until June.  Then the whole month of June I was taking a class that required me to read three books a week plus I got a new roommate.  So all of these things left me little to no time to cook anything more significant than a sandwich.  What's that?  You don't care?  Get to the good stuff?  

Okay, fine.

I am throwing a fourth of July party so there will be a couple of posts here in a row and then some.  Today, we talk all about tortillas. 


I love tacos.  I grew up with taco night being one of my favorites.  I never until now, however, discovered the value of making my own tortillas.  Let me be very clear, this is super easy and less expensive than buying tortillas, it just takes time.  So if time is not something you have, don't embark on this journey because you want it done right.  The ingredients are simple, the process is simple; but the tortilla itself is delicate.  

Here are the ingredients and process:

Yields roughly 18 tortillas

2 cups Mesa (find it in the Hispanic food section in the grocery store)
1 tsp salt
1 1/2 cup water

I mixed the Mesa and the salt together with my hands then I made a well in the bottom of my bowl.  I poured the water into the small well and slowly incorporated the Mesa into it so my fingers didn't get too sticky.  I repeated the same process with the rest of the water and ended up with a dough.  


Now here is where things start to get tricky.  Heat your skillet over medium high heat (cast iron is best but not completely necessary).  You want to take a heaping tablespoon of the dough into your hands and form a ball.


The trick is, if your dough is too wet, it will be really sticky to the touch.  If it is too dry, it will crumble.  If your dough is too wet, you need to add more Mesa (I advise doing that by small spoonfuls).  If your dough is too dry, you can do what I did.  I kept a small bowl of water next to my dough and dipped my fingers in it and then worked the small ball of dough into the right consistency.  It worked really well.  The Mesa soaks up the water like a plant in a drought so adding more water to your big batch of dough really won't help much.

After you have your ball of dough, you will want to place it between plastic.  I took a small sandwich bag and cut it open for this.  You don't want your tortillas much larger than 4" in diameter.  Place the ball of dough between the plastic.


Now, some people have a tortilla press.  I don't.  If you do, all you need to do is press the tortilla out.  If you don't, you can do what I did.  I took one of my bowls (a cereal bowl) and pressed it into a nice circle.  Then I smoothed it out with my fingers until it was the exact size that I wanted.


From here, your skillet should be ready to go.  Peal the top layer of plastic off and brush that side with some vegetable oil.  Then CAREFULLY peal the bottom plastic off and lay the tortilla into the pan oil side down.


I must tell you that my first attempt at this was a literal flop.  I broke probably 4 tortillas which, with how many I ended up making (67), those aren't bad odds.  Basically I am saying you will screw up at least one.  It's okay.  The reason is that once you lay it down in the pan, that's how it stays.  So if it folds over itself when you lay it down, you can't really unfold it.  That's your warning.  You will get it though.  I have every bit of confidence in you.

These cook fast.  The oiled side you want to cook for about 2 minutes (my indicator was I heard the sizzling stop).  Then, you flip it and cook for an additional 15-20 seconds then remove from the heat.

You can make it ahead of time if you want.  Let them cool and store them in a plastic bag.  Or, you can choose to serve them piping hot and right away!  If you make them ahead of time, just heat up the skillet and throw them on for a few seconds to warm them up for your friends and family.  :-)

I recommend topping these with something simple.  If you eat meat, maybe some barbacoa or shredded chicken with some raw onion and tomatoes.  If you are a vegetarian/vegan, maybe some fajita veggies or some pablano peppers with some avocado slices.  With these, simple is best.  You want to taste everything.

Please let me know how this goes for you if you try this at home and...

Let us talk basic kneeds!

Sunday, March 25, 2012

Wonton Raviolis with Basil Brown Butter Sauce

Hey everyone!

So I think that the more irritated I get with my day, the better I cook at the end of it.  I wandered around the kitchen in search of what I was going to make.  I had pretty much decided and then I went the opposite direction.  I have been wanted to experiment with the different uses of the wonton wrapper and I found some at a reduced price at the grocery store; thus, the experiments begin!

I knew I wanted to experiment with a few specific recipes.  I want to conquer:
  • crab rangoon
  • raviolis
  • pot stickers
  • mini lasagnas 
 Tonight, I started with the raviolis.  I love to fly by the seat of my pants when I cook.  I LOVE making up stuff as I go.  I usually end up with great ideas when I let the juices flow.  This was one of those occasions.


What ended up happening was a cheese ravioli with a basil brown butter sauce.  This was SO EASY and it literally took me 25 minutes start to eating and it makes 4 servings.  What I love about the wonton wrappers is that it's lower in calories (so you can have a butter sauce with it) and really easy to work with.  Here is how to do it:

The Raviolis

The Filling:
1 cup cottage cheese
1 egg
1/3 cup Parmesan cheese
1/4 cup chopped green onion
1 tsp garlic powder
1 tsp dried basil
salt and pepper
1/2 tsp red pepper flakes
32 wonton wrappers
water and olive oil

In a small bowl, mix cottage cheese, onions, egg and Parmesan cheese.  It should be easily blended.  Then add the spices, stir, and let rest while you assemble the wrappers.
Preheat oven to 375
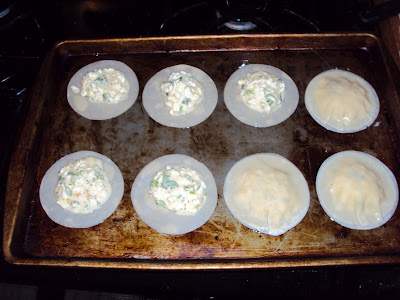
Brush two baking sheets lightly with olive oil.  Place 8 wonton wrappers per baking sheet down and add one spoonful of the filling to each wrapper (there will be a small ball in the center and plenty of space on all sides of the wontons).  Then you are going to dip your finger into some water and wet the circumference of each filled wonton wrapper.  Then place another wonton wrapper on the top and press down until sealed.


 Brush the tops of each ravioli with olive oil.  Place both baking sheets (16 raviolis total) into the oven for about 9 minutes.  The tops of the raviolis will start to puff up and you will smell the filling cooking.  Remove from the oven and let set until the sauce is ready.


The Sauce

1 medium onion chopped
1 orange pepper chopped
1 cup chopped chicken breast (I used tofu chicken breast substitute)
3 medium mushrooms sliced
1 T minced garlic
1 tsp basil
salt and pepper
6 T butter

Start by sauteing onions and garlic together in 1/2 T of the butter on medium heat until the onions are soft.  Add the chicken (or tofu) and stir for 1 minute.  Add the peppers, mushrooms and seasonings and stir for about 3-5 minutes.  You want your orange peppers to be slightly softened.  Then add the rest of the butter and immediately reduce the heat to low.  Throw in the raviolis and stir to coat in the sauce.  Stir the butter and let it set until it starts to turn brown.  Serve.


I finished this off with a little Parmesan cheese.  This is really tasty and easy.  I ate this with a solid glass of wine on the side.  It's fun to put together with kids or a spouse.  It's a great way to get some help in the kitchen and being quick about it.  I highly recommend throwing the ravioli into the sauce and mixing it before you serve it.  I just poured the sauce on the top and I found the edges of the wontons a little crunchy.  Throwing the raviolis into the sauce before serving should remedy that.  Let me know how it turns out for you!

Let us talk basic kneeds!

Sunday, February 19, 2012

Peanut Butter, Oatmeal, Chocolate Chip Cookies!

Hey guys!

So this is a tried and true recipe for me.  It's my go-to cookie recipe when I want to give a gift or just make something that I know people will enjoy!  It is, by far, my favorite cookie next to my sentimental molasses cookies  :). 

Here is the recipe:

Wet ingredients:
1 stick of butter
1/2 cup of sugar
1/2 cup brown sugar
1/2 cup peanut butter (crunchy or creamy)
1 egg
1 1/2 tsp vanilla extract

Dry ingredients:
1 cup flour (I use whole wheat)
1 cup oats
1/2 tsp baking soda
1/2 tsp baking powder
1/4 tsp salt
1/4 tsp cream of tartar (optional)

1+ cup of chocolate chips or chunks

Preheat oven to 375

Mix the dry ingredients.
Beat together the butter, sugar and peanut butter until creamy.  Then add the egg and vanilla and beat until it's just blended.  Add the dry ingredients in two batches and stir together with a wooden spoon.  Stir in chocolate chips and add as many as you want!  Let the dough sit for about 5-10 minutes.  Spoon dough with a spoon onto a baking sheet and bake for about 10-12 minutes depending on your oven.   This yields about 40 cookies.


These are super easy and super tasty.  Let me know how they turn out for you!

Let us talk basic kneeds!

Saturday, January 14, 2012

Whole Wheat Pizza Crust!

Okay,

It has been a really long time since I have posted a recipe and I attribute it to business.  This means I have less time to be creative and try out new things.  Tonight, however, tonight was different. 

I took my first whack at a whole wheat pizza crust.


I think it turned out pretty good.  Here is what I did:

CRUST (makes 2 pizzas)
1 package active dry yeast
1 1/4 cup warm water (DO NOT EXCEED 115 degrees!!!)
1 tsp sugar
1 T olive oil
1 tsp salt
2 1/2 cups Whole Wheat flour (plus some for kneading)

You want to place the yeast in a large bowl and add the water.  The reason why you don't want the temp of the water to get higher than 115 is because you will kill the yeast and your dough won't rise (PROBLEM!).  Then you stir in the sugar and let this mixture rest for 5 minutes.  (You will see the yeast popping up in the water.  This is a very good thing).

After 5 minutes, add the oil and the salt and stir.  Then begin to stir in the flour 1 cup at a time.  The dough will become slightly stiff and pull away from the sides of the bowl.
Then you want to turn the dough out onto a surface that has a little bit of the flour on it.  You will now knead the dough for about 8 minutes or until you don't feel any lumps in it. (In recipes they call this "smooth").

After you are done here, you want to lightly coat the dough with olive oil, place back into the bow, cover and let raise for about 45 minutes.  (They call this "double size" in recipes)
**If your dough is not increasing in size, you killed your yeast and should probably start over**

While your dough is rising, it's time to prep the sauce and toppings!

SAUCE (makes enough for both pizzas)
1 can tomato sauce
2 tsp minced garlic (about 2 cloves fresh)
1 tsp dried oregano
1 tsp sugar
1/2 tsp crushed red pepper
1/2 tsp fennel seed
salt to taste

You just want to mix all of these ingredients together.  **Be sure to taste it!!!**
Also now is the time to get any cheese (about 8 oz mozzarella per pizza) and other toppings ready for assembly!  

Preheat your oven to 450 degrees now!

After your dough is done rising, you get to punch it down (fun part) and split into two equal parts.  You can either make both pizzas or store the other for a later date by wrapping it in plastic wrap and freezing it!


Now you get to spread the dough out onto a greased either baking sheet or pizza pan and poke holes in it with a fork!
This is a fun part to do with the kids.  I always loved doing this when I was one!


As you can see, it will cover most of one whole baking sheet.  Now you will put your crust in the over for about 10 minutes.  Remove your crust from the oven and top your pizza (sauce, parm cheese, toppings, mozzarella)!  Again this is a fun part for the kids!  (I took my crust off the hot pan and placed it on a cooling rack so I didn't get burned while assembling!)

Once your pizza is ready, place it either back on the baking sheet or on your baking stone (preheated in the oven) and bake for about 15-17 minutes (bake time may vary depending on oven) or until your cheese is bubbly and brown!


Once it is done, remove it from the oven and let it cool for about 5 minutes.  Then you can cut it and enjoy!


Please let me know how yours turns out!  I really enjoyed mine! 
Let us talk basic kneads!